Resilient channel (RC) is a popular option in acoustic design and construction. While RC promises a huge positive effect on the acoustical performance of a wall, facade, or floor/ceiling, the reality after installation can be disappointing, even failing to meet code minimum for multi-family housing projects.
Installation Problems With RC
With many decades of combined experience at ABD, we’ve seen a lot of ways that RC can be installed incorrectly. Some of these are minor, but as more problems are introduced, the effect grows. Just a couple of minor installation problems can be the difference between decent performance and failing to meet code. Also, see our companion article about using RC in design.
RC Sandwich
For resilient channel to properly function, it needs to have a large open cavity behind it, so it should be attached directly to the studs or joists. If the RC is installed between two sheet layers (RC sandwich), it is catastrophic to the acoustical rating – tests have shown that a wall with an RC sandwich performs almost the same as a wall with no RC at all (15-20 STC and IIC points lower than design).
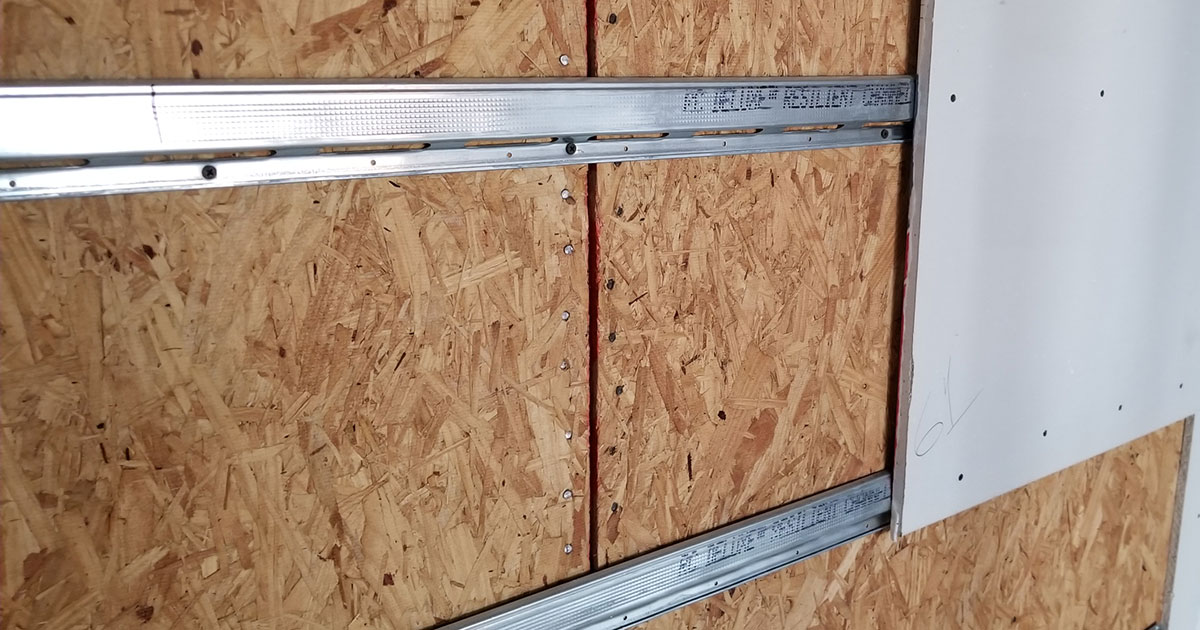
Incorrect: note the RC installed in a sandwich between two sheet layers.
This condition most often occurs on shear walls where a layer of plywood is required to be attached directly to the studs, then the RC is installed over that plywood. There is also a common UL fire-rated floor/ceiling assembly (L.538) that uses RC between layers of drywall to improve the fire rating, but because of the RC sandwich, the RC provides no acoustical benefit.
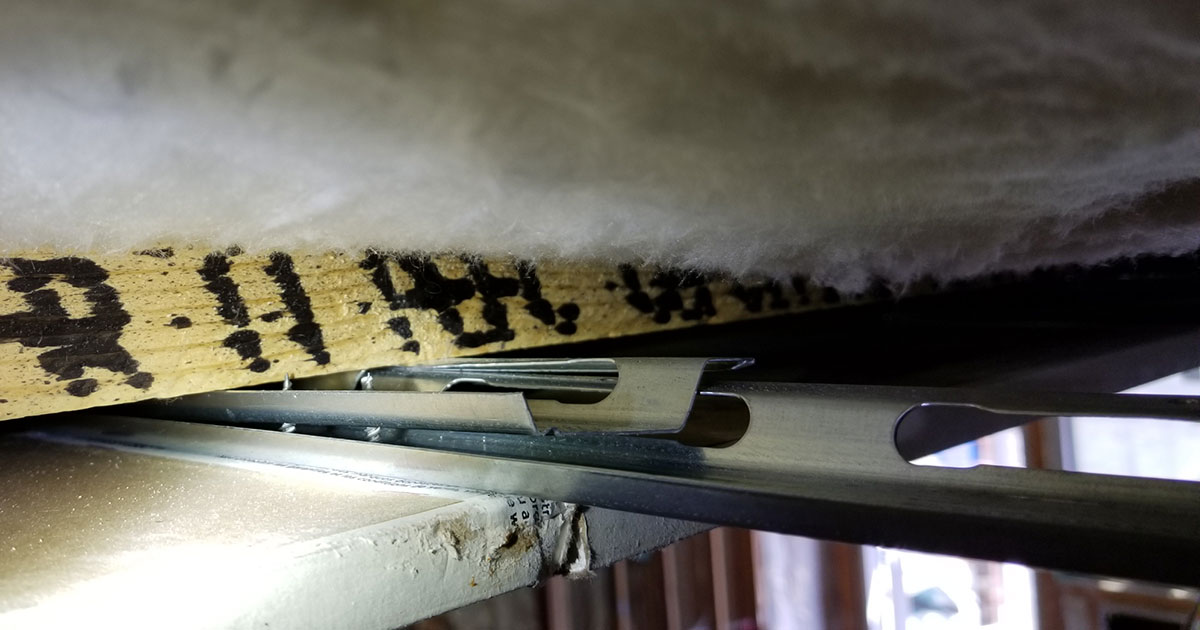
Screw Length / Short-Circuiting
This is by far the most common issue we see with resilient channel installation. If the screws used to attach the drywall to the RC are too long, they can accidentally get screwed into the framing. For attaching a single layer of standard 5/8″ gypsum board, the screws should be 1″ long. This screw length is long enough to provide sufficient grip into the channel, but short enough that it won’t touch the studs.
There are, of course, caveats to this. Even with the correct screw length, there are many instances in which a screw can still contact the studs:
- Some types of drywall have a tapered edge for finishing, which means the screw will drive deeper on the edge than in the middle.
- If the torque setting on the drill is too high, the screws can be overdriven; that is, the screw head can sink into the drywall board.
- When the drywall is being hung, if the installer is pressing hard on the board, it can crush the RC.
Several labs have performed testing to determine the effect of short-circuiting. A single short circuit can reduce the STC and IIC by 1 point. In addition, the low-frequency performance is severely reduced, which means that low “bassy” sounds will come through louder, and the thud of footfalls will also be louder on floor/ceiling assemblies. In the worst case with many short-circuits, the STC and IIC ratings can be reduced by as much as 10 points.
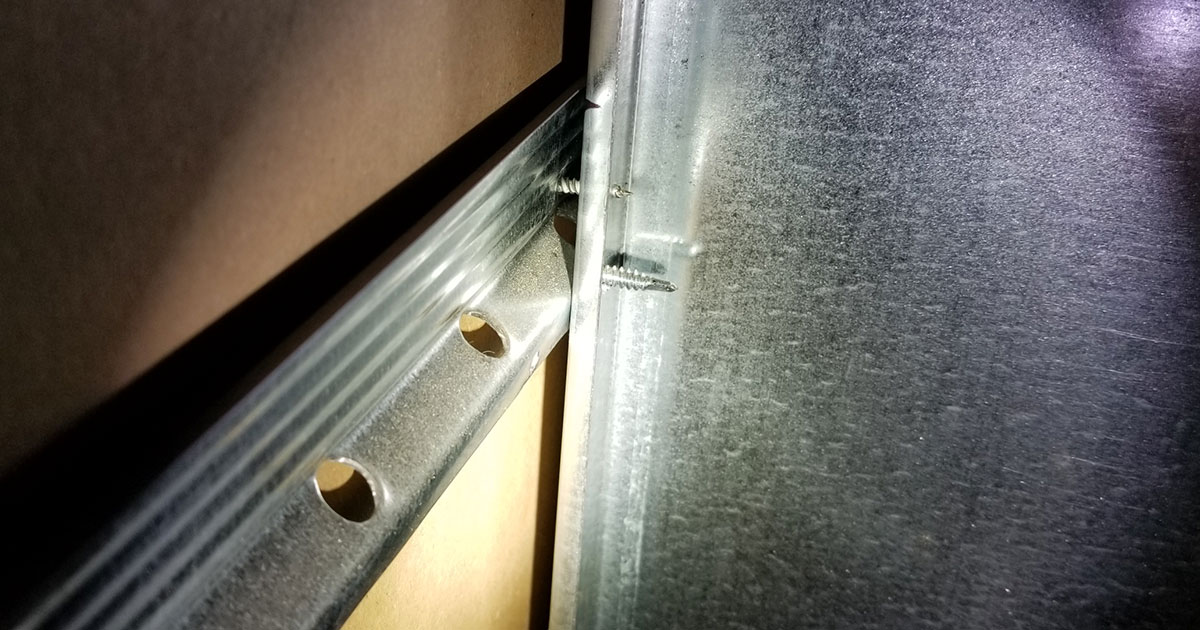
Incorrect: note the upper screw penetrating the stud, short-circuiting the RC.
RC Spacing
Studs and joists are usually spaced at either 16 or 24 inches apart, referred to as 16″ on center (o.c.) or 24″ o.c. Resilient channel should be installed using the opposite spacing, so a wall with 16″ o.c. studs should have the RC at 24″ o.c., and vice versa. If both the studs and RC are at 24″ o.c., the RC cannot carry as much weight, which means that the drywall is not well supported. If both the studs and RC are at 16″ o.c., it becomes stiffer and less effective, and the STC and IIC ratings can drop by several points. At a glance – 16on16 spacing forms squares, while 24on16 or 16on24 form rectangles.
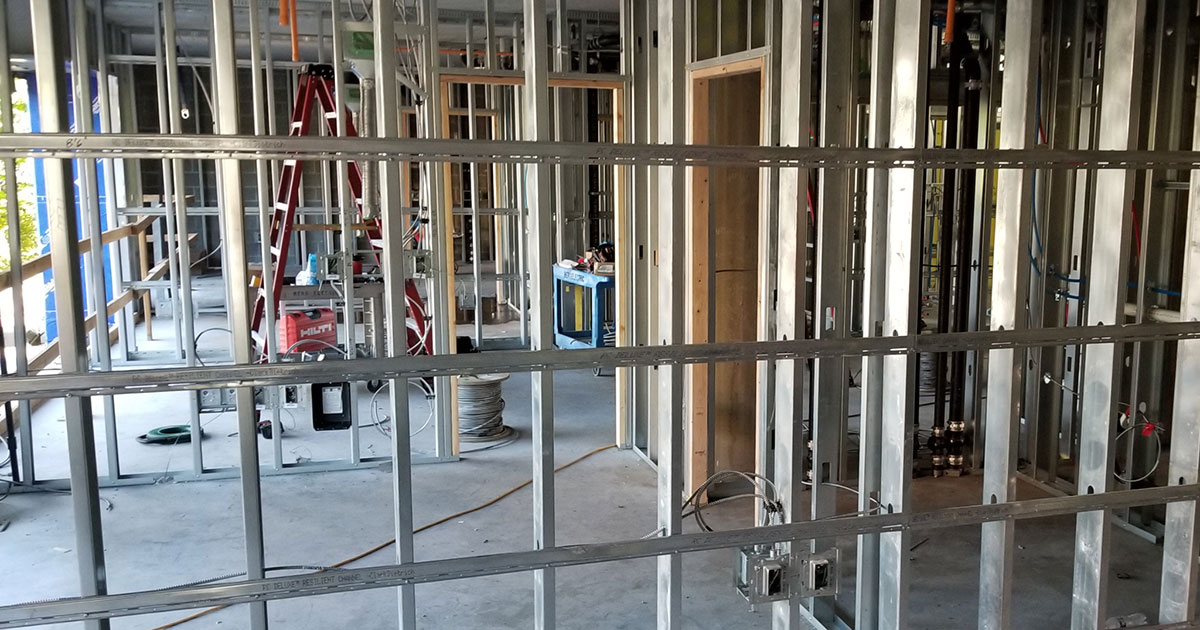
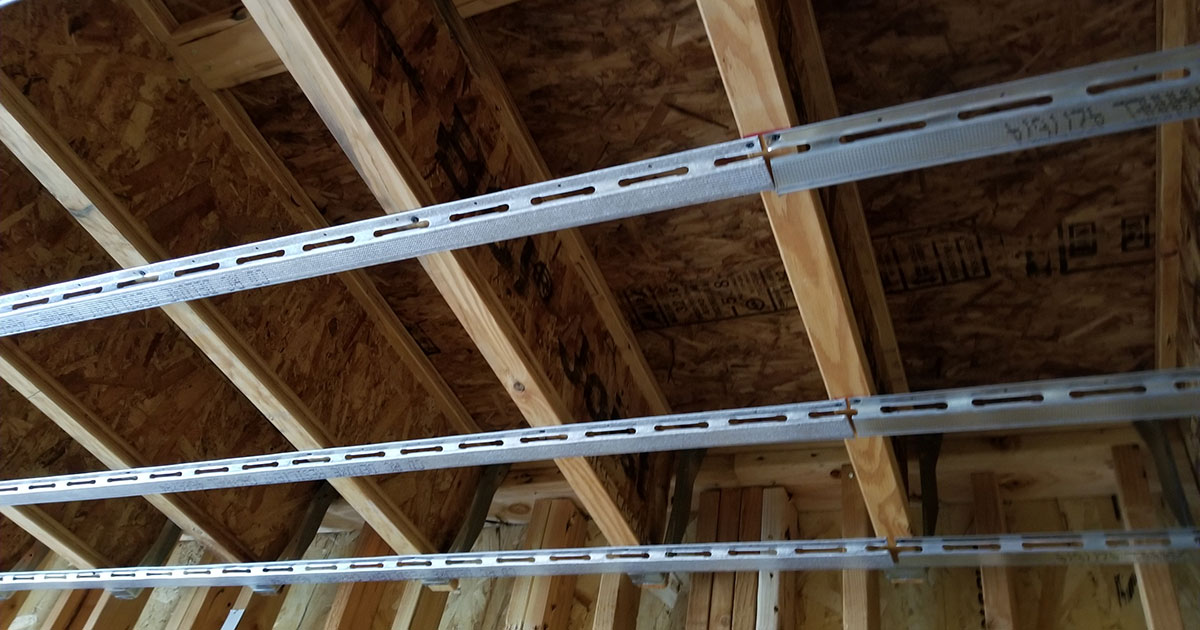
Correct: RC is spaced at 24″ o.c. on 16″ o.c. studs or 16″ o.c. for 24″ o.c. studs.
Orientation
On walls, RC should be installed with the free leg facing upwards (that is, the leg that attaches to the stud is on the bottom, and the leg that attaches to the drywall is on top). This is so that the weight of the drywall will cause the RC to pull outward and perform correctly. If it is installed upside down, the weight of the drywall will start to crush it into the stud and cause it to perform worse by several STC points. On ceilings, the RC should all be oriented in the same direction.
Incorrect: note RC is installed upside-down.
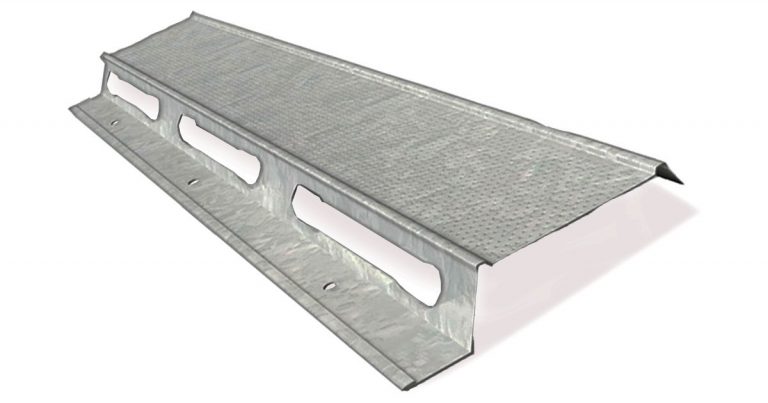
Attachment to framing
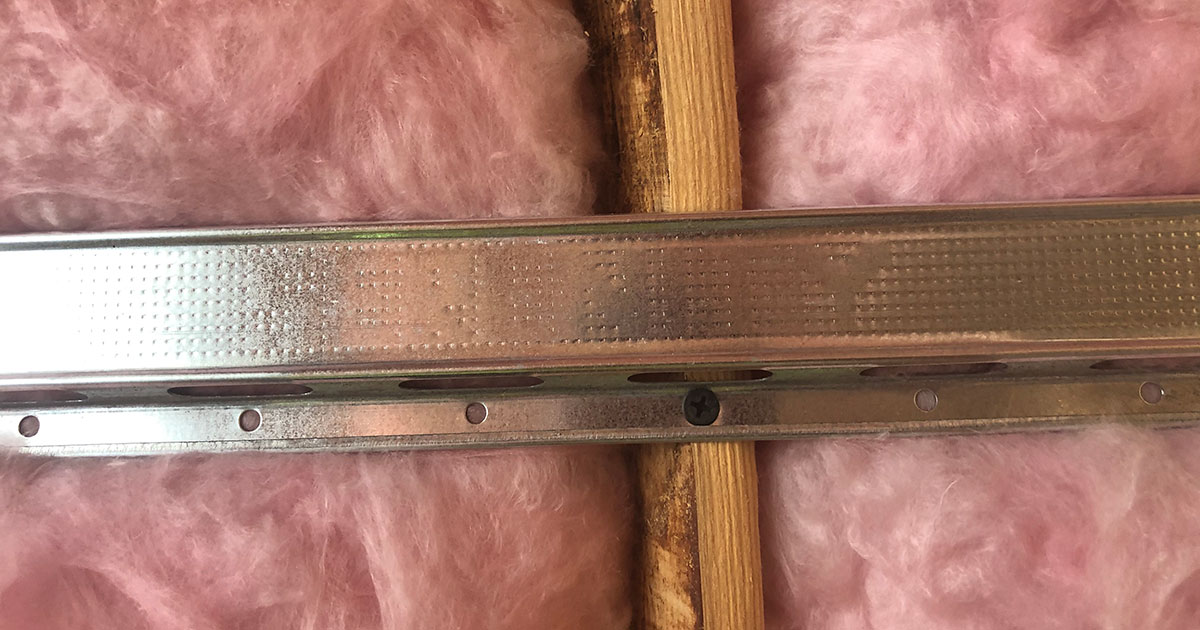
RC is designed with pre-drilled holes every 4″ along the framing leg. On well-designed RC, these holes are centered in the middle of the long web slots. This is intentional – by attaching the framing leg at the slot, vibrations have a harder time transferring through the channel. So, RC should be attached to the framing using the predrilled holes as much as possible. If the RC is offset, the STC and IIC ratings can be reduced by as much as 3 points.
Incorrect: note the predrilled holes every 4″. The screw is attached in-between these holes.
Correct: the screw is correctly attached through predrilled hole.
Splicing
At long walls or ceilings, a single length of RC is too short, so multiple lengths will need to be joined together end-to-end. The best way to do this is to butt the two ends together at a stud, leaving a 1/16″ gap between the ends.
We often see installations where the end of one piece of RC is nested inside another – this can cause issues with stiffening, deformation, and crushing, which can lead to unintended contact between the free leg and the stud.
Correct: RC is spliced end to end at the stud or joist.
Incorrect: note the deformation and overlap at the joint.
Crushing/Damage
RC is a fairly fragile item, so it can easily be damaged or deformed during installation, which can reduce the effectiveness of the RC or lead to short-circuiting. This damage can occur at any time:
- Before installation, RC generally stored in large piles, often in high traffic areas where it can be stepped on.
- After the RC has been installed but before the drywall is hung, the RC is highly susceptible to impacts.
- During drywall installation, if the drywall is pressed hard up to the RC, it can crush the RC.
- After installation, if other trades are performing work within the wall (such as plumbing or electrical), they can sometimes catch and damage the RC.
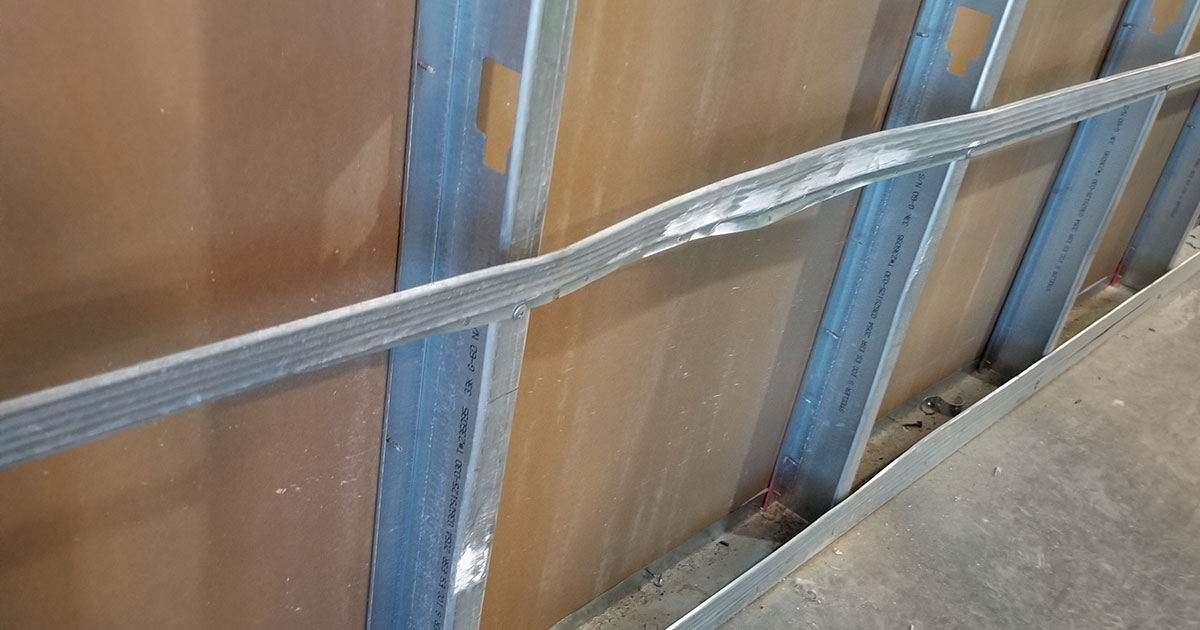
Incorrect: note the damaged RC.
Corner and Ceiling Detail
For RC to work properly, the drywall needs to be able to flex freely. If the edges are held rigidly in place, the acoustical ratings can drop by several points. The correct way to detail these wall-to-wall and wall-to-ceiling corners is to leave a small gap between the two layers of drywall when hanging it, rather than butting them up hard together. Then, to make sure there is no opening that sound can travel through, the gap is filled with an acoustical caulk, which is designed both to block sound through itself and to remain flexible for years.
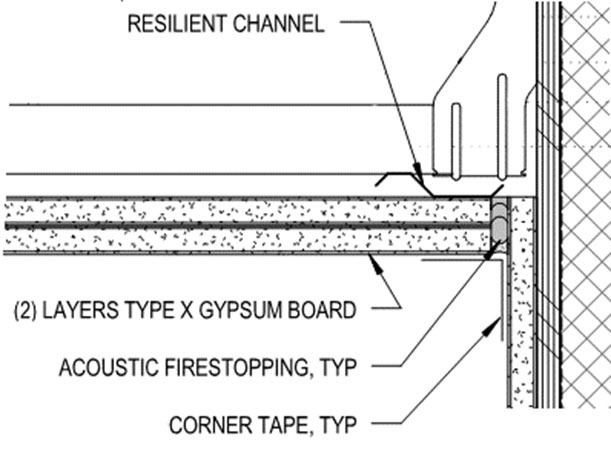
Correct detail of wall-ceiling corner intersection. Note the gap filled with acoustic caulk.
Correct gap at wall-ceiling corner intersection.
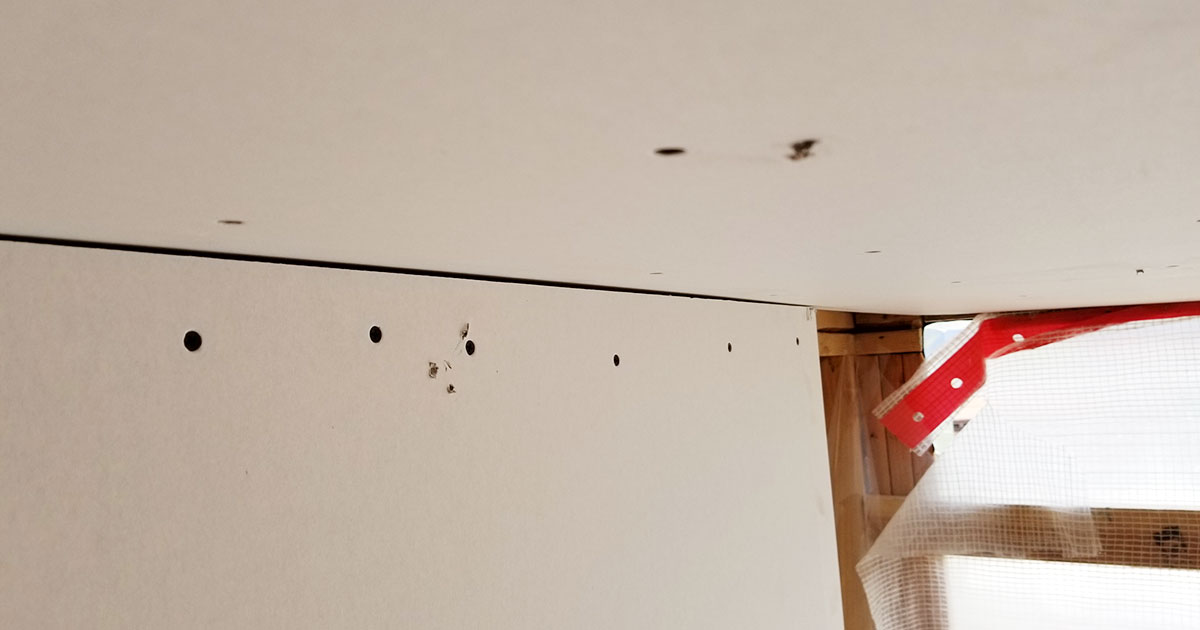
Wall-to-Floor Detail
Many new buildings, especially apartment complexes, are utilizing a gypsum concrete (gypcrete) floor on top of wood joists. Once the joists and plywood subfloor are installed, the gypcrete is pumped in to flow over the entire floor. If the drywall has been installed before the gypcrete, then a perimeter isolation strip should be installed at the base of the wall – this prevents the gypcrete from flowing under the drywall and rigidly embedding the bottom edge.
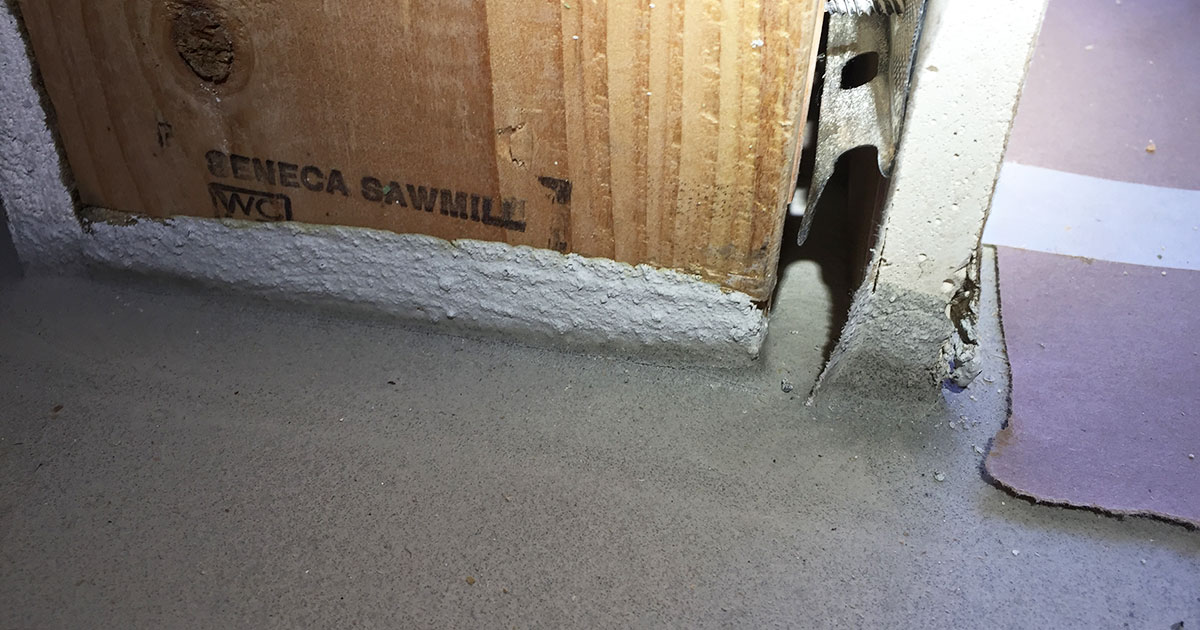
Incorrect: gypcrete installed without perimeter isolation strip, so gypcrete has flowed under and behind drywall.
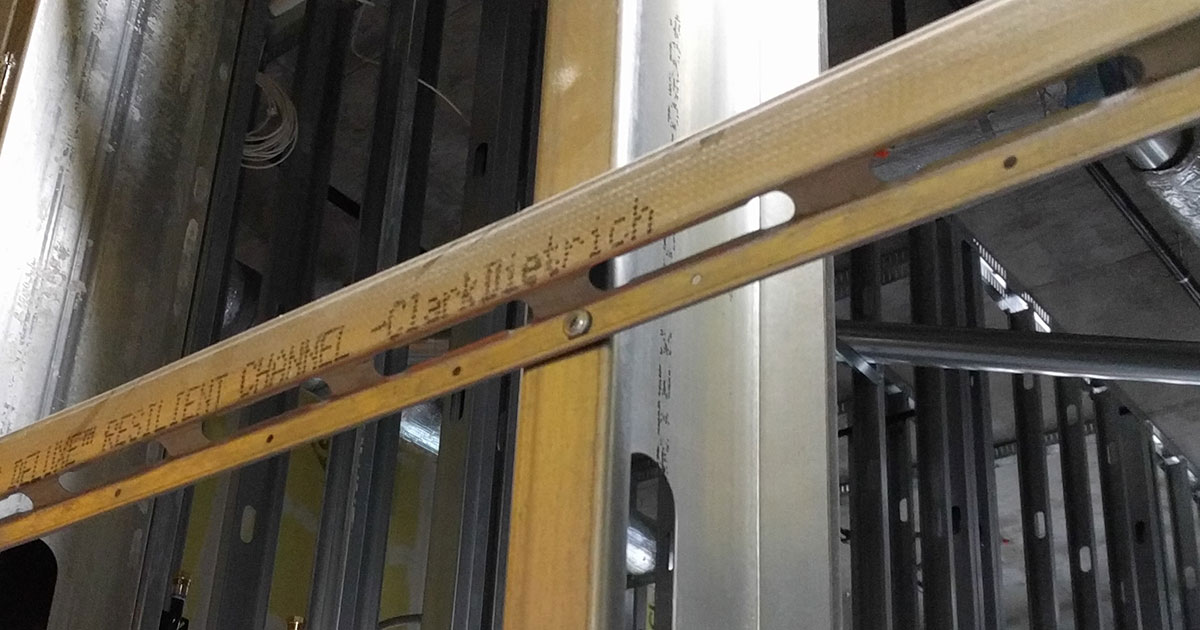
Incorrect Product Installed
As noted in our article about design issues with resilient channel, resilient channel products can perform differently in the same assembly. Assuming the assemblies in the design documents and specifications include the approved resilient channel model, it can be missed or ignored. However, even if this is correctly specified in the design documents, it can be missed or ignored, and the wrong type of RC can get installed. Even if this is caught during installation, there is a cost associated with tearing it out and installing the correct model, and possibly a construction delay while the new RC is shipped in.
Preferred Alternatives to RC
As you can see, there are many reasons to avoid the use of resilient channel. There are ways to build assemblies that avoid most or all the issues with RC while also providing better acoustical performance. A qualified acoustical consultant can help to tailor the appropriate assembly designs for your project, taking into consideration the intended usage and rating, loading, assembly thickness, structural constraints, plumbing runs, and more.
Acoustical Isolation Clips
Isolation clips consist of a metal-and-rubber clip that attaches to the framing, and a standard furring/hat channel that fits into the clips. These clips perform significantly better than RC and have fewer potential installation problems. In many cases, an acoustical isolation clip can be used instead of RC.
Since the isolation clips have much better performance than resilient channel, it may be possible in some cases to reduce other construction materials while maintaining the same acoustical rating. For instance, a wall with RC and two layers of drywall on each side (4 total layers, and assuming it has been installed perfectly) has a similar performance to the same wall with isolation clips and one layer of drywall on each side (2 total layers). So, while the per-unit cost of the isolation clips is somewhat higher than RC, this can be offset by savings in other materials and a better rating.
Isolation clips have additional benefits, including:
- Isolation clips can carry heavier loads than RC. For especially high-load scenarios such as handrails or cabinets, there are pre-designed isolated mounting backers made of the same materials, which simplifies installation.
- There are several manufacturers that can produce quality isolation clips. Based on our experience and significant amounts of test data, we know how well these clips will perform and can provide several acceptable manufacturers to solicit competitive bids.
- Isolation clips can be used in some scenarios where RC cannot. For instance, at a double-shear wall (where plywood is attached directly to both sides of the studs for structural reasons, common at stairwells in multi-story wood-framed buildings), RC is not acceptable because it would create an RC sandwich. An assembly using isolation clips can be used in this situation, which satisfies both the structural and acoustical requirements.

Correct: note the isolation clip (PAC International RSIC-1) installed.
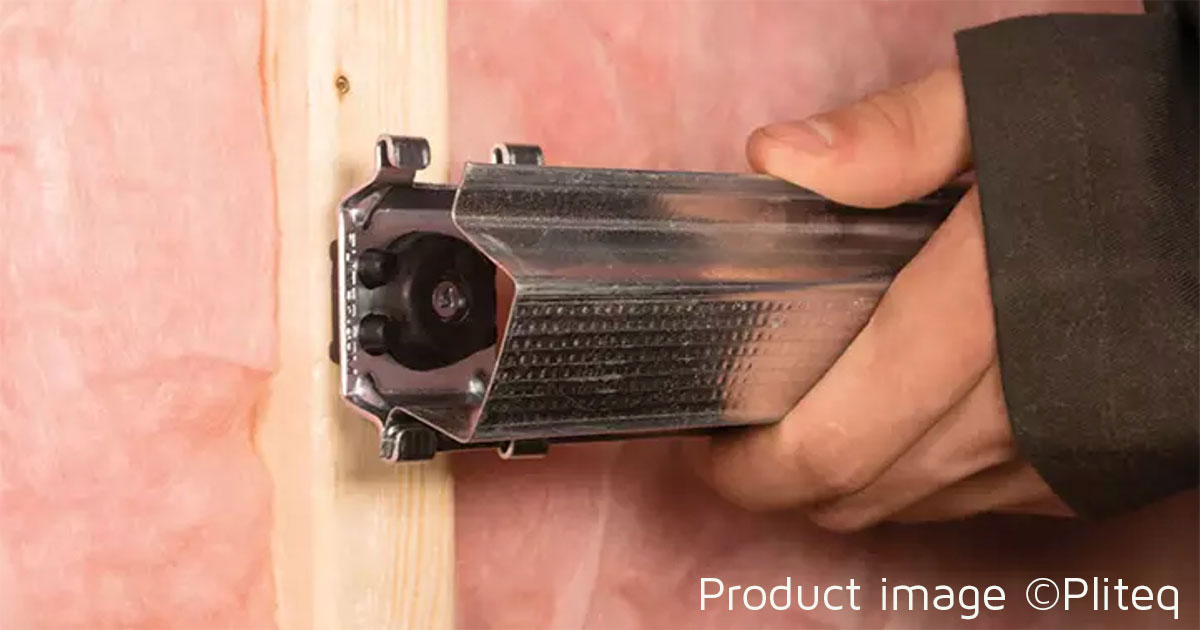
Correct: installation of GenieClip isolation clip (photo courtesy of Pilteq)
Double Stud, Staggered Stud, or Furring Walls
There are several types of wall assemblies where the drywall on one side is mounted to one set of studs, while the drywall on the opposite side is mounted to a different set of studs. If both of these sets of studs are on the same floor plate and are staggered alternately to one side then the other, this is referred to as a staggered stud wall. If the two sets of studs are installed each on their floor plate, this is referred to as a double stud wall (or sometimes a furring wall, depending on context).
Double stud assemblies tend to have very high acoustical performance and are typically used where high noise isolation is required, such as between an apartment and a mechanical room, or between condominium units, or even in recording studios. Staggered stud assemblies tend to have similar ratings compared to an RC wall, though special care is needed during design to successfully incorporate structural and fire requirements without compromising acoustics.
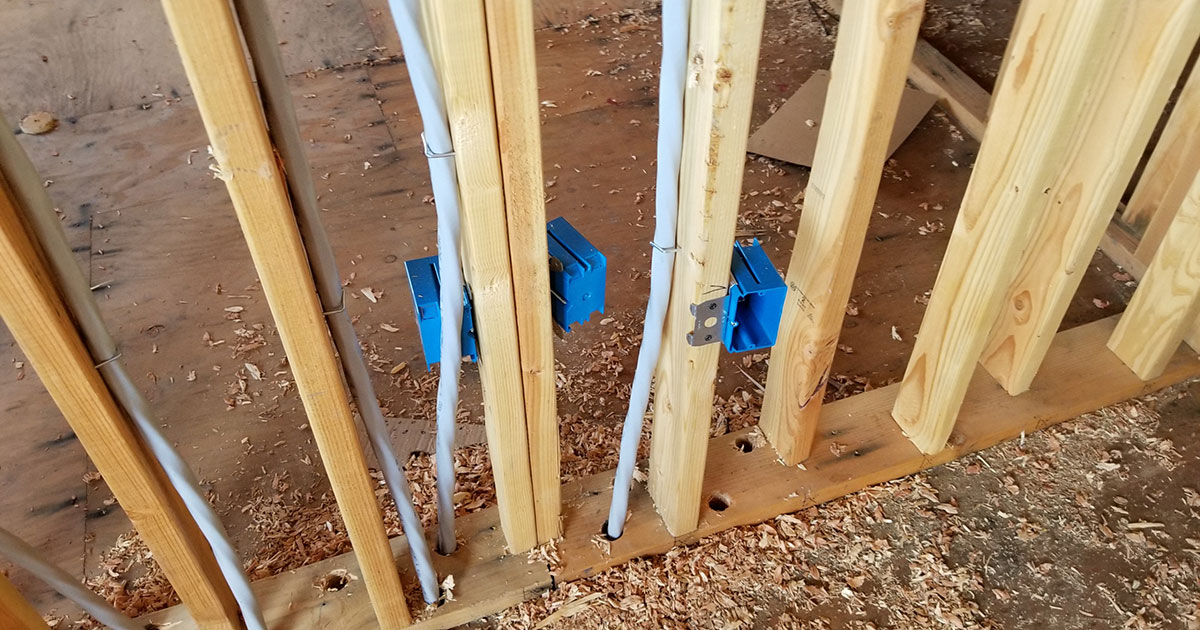
Correct: staggered wood studs.
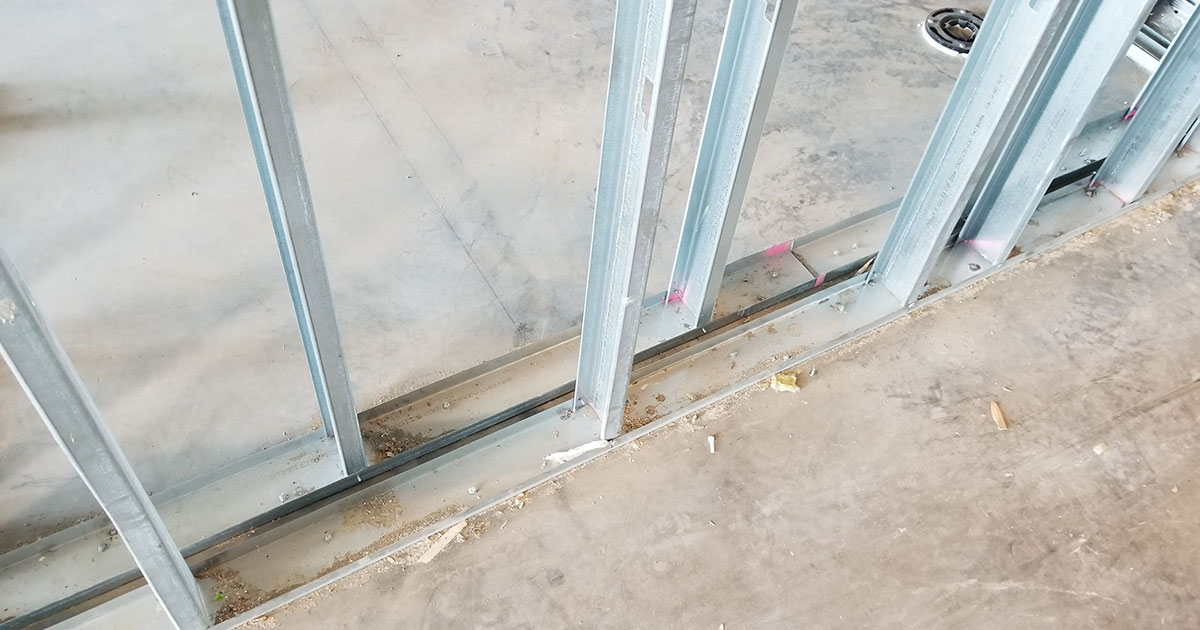
Correct: double metal stud.
Further Reading
The issues with resilient channel are well-studied and reported. More about using RC in design.
The following articles and papers below delve deeper into the issues discussed in this post.
- Resilient Channel Update. Jerry Lilly, JGL Acoustics. Sound and Vibration 2002. A review of the history of RC-1 and RC Deluxe.
- Quantitative comparisons of resilient channel designs and installation methods. John LoVerde and Wayland Dong, Veneklasen Associates. InterNoise 2009. A discussion of common RC installation issues.
- Quantitative comparisons of resilient channel design and installation in single wood stud walls. John LoVerde and Wayland Dong, Veneklasen Associates. International Congress on Acoustics 2010. A summary of common installation errors.
- Resilient Ceiling Construction in Residential Buildings. Anthony Nash, Charles M. Salter Associates. International Congress on Acoustics 2007. A discussion regarding RC styles and perimeter gaps.
-
White Papers courtesy of Pliteq:
- Resilient Channels: Guaranteed to Fail. Matt Golden, Pliteq. White paper. Discussion of common failure modes of RC.
- Resilient Channel: One Screw Makes a Difference. Matt Golden, Alex Vaisman, Pliteq. White paper. Effect of screw short circuits.